Warning: Photo Jargon Ahead! If you are here to just see pretty pics of Karen, scroll down.
I have one more vacation post to write, but I am breaking things up with this portrait session. This was done for Strobist's "Umbrella Specular Portrait" Assignment, the second one in the Lighting 102 series (my results for the first assignment can be seen here).
A quick background for you non-photogs: A specular highlight is just the reflection of your light source on an object. In the example below, the yellow areas indicate the specular highlights. There are two specular highlights on the 8-ball because I was using a flash on-camera to trigger the main flash that was off to the right. This makes a good point. My on-camera flash is not bright enough to contribute to the exposure of the image but the billiard ball so shiny that the light is reflected and appears in the image as a specular highlight. With a little creativity, this knowledge can come in quite handy. The white arrow points to what is known as the diffused highlight (the entire bright side of the billiard ball). As in the game of billiards, the control of specular highlights is geometry in practice.

Enough background, let's get down and dirty. Remember how I said that knowing how to manipulate specular highlights can come in handy? That is the whole point of this assignment: to use the specular highlight of a light source as an interesting background element. Typically, a traditional studio portrait uses several lights: a main light, a background light and sometimes a hair light. At weddings, I find myself trying to create studio-quality portraits 1) quickly, 2) in random rooms/hallways and 3) with a minimal amount of gear. Using specular highlights, I can create a portrait with one light. All I need is a dark reflective surface to use as a background. These can easily be found once you are looking for them. The trick is to line yourself up so that you see the reflection of your light on the background (imagine the light is the cue ball and you are the pocket or vice-versa). Placing the specular highlight somewhere near Karen's face helps draw the viewer's eye to her.
Lucky for me, Karen (my wife) is a an excellent model and very patient with me. Lately, I have been focusing on Karen's pregnant belly, but for this we just concentrated on portraits.
The assignment had two parts. In addition to the lighting, we were supposed to try and create a real portrait; capture a meaningful moment or expression (most of my lighting experiments consist of a tripod, a timer and me staring blankly into the camera). Although some of the other images are composed a little better, this was the one that revealed the most about Karen's personality so I chose it as my final submission.
.jpg)
Some of my other favorites:
.JPG) I have to mention that these pics are straight out of the camera. A slight contrast was applied in Adobe Camera Raw, but no Photoshop was used. Karen has awesome skin and is a pro at makeup. Combine that with a big, soft, bright light source and you get fantastic images.
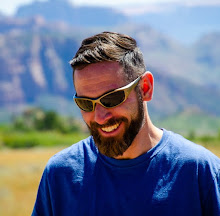
I have to mention that these pics are straight out of the camera. A slight contrast was applied in Adobe Camera Raw, but no Photoshop was used. Karen has awesome skin and is a pro at makeup. Combine that with a big, soft, bright light source and you get fantastic images..jpg) We pulled out about 5 different shirts and decided to go with this one since the cool blue is such a nice contrast to the warm brown/orange door.
We pulled out about 5 different shirts and decided to go with this one since the cool blue is such a nice contrast to the warm brown/orange door..jpg)
.jpg)
The assignment was to use one light, but after we had lots of great frames I wanted to add some more dimension to the photograph. A snooted hairlight from above gives the image extra "pop."
.jpg)
Here are a few setup shots so you can see that it is possible to create professional studio-quality images just about anywhere. The background was one of those flimsy hollow doors. I was practically standing in the closet. You can see the snooted hairlight in these pics, but it was only used for the image directly above..jpg)
.jpg)
This is from my perspective. You can see the reflection of the umbrella in the door (it's not as pronounced here because I lowered the exposure so you could see the umbrella). The dark part of the image on the right is the inside of the closet. PS, if any of you were interested, you now know what color we painted the nursery!.jpg)
That's all for now!
1 comment:
WOW! You must have learned from Jerry Ghionis! ha ha - That 85mm lens sure looks sweet! Karen looks like a top fashion model and not a "mom-to-be"!!!
Post a Comment